简介
原文: fastlane is the easiest way to automate beta deployments and releases for your iOS and Android apps. 🚀 It handles all tedious tasks, like generating screenshots, dealing with code signing, and releasing your application.
Fastlane 是一套由Ruby写成的自动化工具集, 可以自动部署和发布(iOS/安卓)应用, 可以自动执行繁琐的任务,例如生成屏幕截图, 处理配置文件和发布应用程序
其他开源持续构建平台有:
Jekins 需要搭建环境, 配置过程比较繁琐
fir.im 后来也推出了flow.ci, 支持fastlane 相对比较简单, 需要依赖 Docker 服务
如何使用fastlane for iOS
-
安装最新的Xcode命令行工具
1
 $ xcode-select --install
如果提示:
xcode-select: error: command line tools are already installed, use “Software Update” to install updates
表示已安装, 直接进行第二步
-
安装fastlane
1
2
 # 使用 RubyGems 安装
 $ sudo gem install fastlane -NV
或者
1
2
 # 使用 Homebrew 安装
 $ brew cask install fastlane
-
初始化fastlane
使用终端并cd到项目路径下, 例如:
1
 $ cd fastlaneTest
然后执行初始化命令:
1
 $ fastlane init
然后会出现4个选项:
1 2 3 4 5 6 7 8 9 10
1. 📸 Automate screenshots(自动化截图) 2. 👩✈️ Automate beta distribution to TestFlight(将测试版分发自动化到TestFlight) 3. 🚀 Automate App Store distribution(自动发布到App Store) 4. 🛠 Manual setup - manually setup your project to automate your tasks(手动设置 - 手动设置您的项目使得您的任务自动化)
此时, 我们选择第4项, 等待
bundle update执行结束, 并输入回车, 直至结束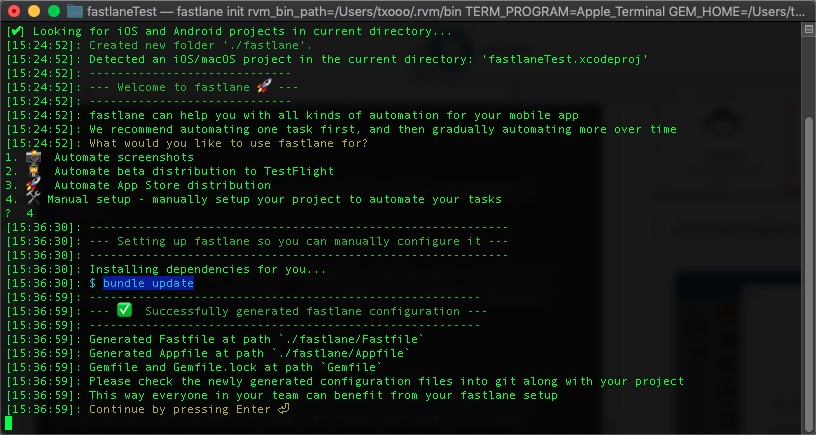
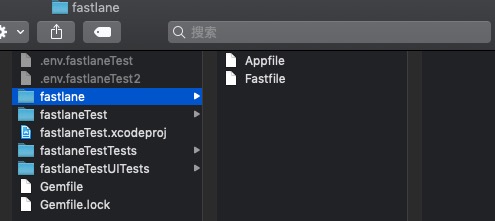
可以看到项目路径下多了三个文件(夹):
fastlane(文件夹), 包含文件:Appfile, Fastfile
Gemfile
Gemfile.lock
如果选择 3 的话, 需要先输入苹果开发开发者账号密码, 然后会自动下载App元数据等信息, 我们选择 4 可以后续再相关配置文件中补上, 并且通过修改配置文件达到多target支持
-
编辑 fastlane 相关file
-
新建 .env 文件
文件命名格式: .env.targetName(项目中每个target的名字), 该文件默认为系统隐藏文件, 需要将其显示
作用: 提供后续一些参数配置, 不同 .env 文件可为不同target提供不同参数
下图 fastlaneTest 和 fastlaneTest2 分别为两个target
编辑 .env file:
1
2
3
4
5
6
7
8
9
10
11
12
13
14
15
16
17
18
19
20
21
22
23
24
25
26
27
28
29
30
31
32
33
34
35
 # APP唯一标识符
 APP_IDENTIFIER = "项目 bundleID"
 # 发布版本号 可根据Xcode获取
 # APP_VERSION_RELEASE = "1.0.0"

 # 新版本修改记录
 RELEASE_NOTES = "1) 增加了一些功能\n2) 修复了一些BUG"

 # 蒲公英 更新描述
 # FIR_UPDATE_DESCRIPTION = "1) 增加了一些功能\n2) 修复了一些BUG"

 # 自动提交审核
 SUBMIT_FOR_REVIEW = false

 # 审核通过后立刻发布
 AUTOMATIC_RELEASE = false

 # 苹果开发者账号
 APPLE_ID = "Your Apple ID"

 # 苹果开发者帐号密码
 FASTLANE_PASSWORD = "Your Apple ID Password"

 # 套装ID 可登录 developer.apple.com 查看
 TEAM_ID = "your_team_id"

 # 应用target名称
 SCHEME_NAME = "Target Name"

 # APP元数据及截图存放路径 默认会在fastlane目录下新建metadata文件夹, 不同target的元数据都放在此路径下,
 METADATA_PATH = "./metadata/fastlaneTest(自定义的路径)"
 SCREENSHOTS_PATH = "./screenshots/fastlaneTest(自定义的路径)"

 # APP元数据及截图下载时,直接覆盖原有数据,不询问
 DELIVER_FORCE_OVERWRITE = true
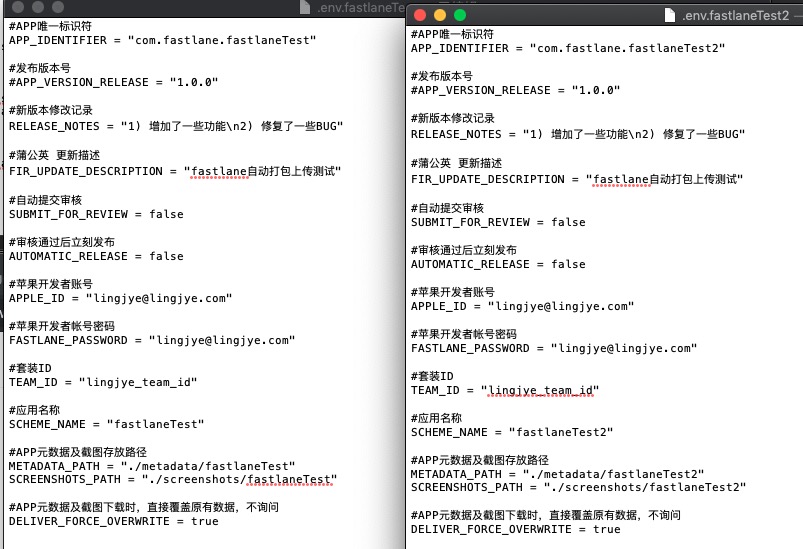
多个target参考:
-
编辑 Appfile
找到项目路径下的fastlane文件夹, 打开Appfile, 编辑内容:
1
2
3
 app_identifier ENV['APP_IDENTIFIER']
 apple_id ENV['APPLE_ID']
 team_id ENV['TEAM_ID']
-
编辑 Deliverfile
在fastlane目录下, 新建文件名为Deliverfile, 该文件与Appfile同级
编辑内容:
1
2
3
4
5
6
7
8
9
10
11
12
13
14
15
16
17
18
19
20
21
22
23
24
25
26
27
28
29
30
31
32
33
34
35
36
37
38
39
40
41
42
43
44
45
46
47
48
49
50
51
52
53
54
55
 # The Deliverfile allows you to store various App Store Connect metadata
 # For more information, check out the docs
 # https://docs.fastlane.tools/actions/deliver/
 # The bundle identifier of your app
 app_identifier ENV['APP_IDENTIFIER']
 # your Apple ID user
 username ENV['APPLE_ID']

 # 元数据的路径
 metadata_path ENV['METADATA_PATH']
 screenshots_path ENV['SCREENSHOTS_PATH']

  #App store 中待发布的 App 版本,若每个 target 的版本号不同,可以通过.env 文件来分别定义
  # app_version ENV['APP_VERSION_RELEASE']

  #下载 metadata 及 screenshots 时直接覆盖,不询问
  force true

  #不覆盖 iTunes Connect原有截图
  skip_screenshots true

  #自动提交审核
  submit_for_review ENV['SUBMIT_FOR_REVIEW']

  #审核通过后立刻发布
  automatic_release ENV['AUTOMATIC_RELEASE']

  #新版本修改记录
  release_notes({
     "zh-Hans" => ENV['RELEASE_NOTES']
  })

 #App 加密算法使用情况及广告相关配置
 submission_information({
     #Export Compliance
     export_compliance_available_on_french_store: "false",
     export_compliance_contains_proprietary_cryptography: "false",
     export_compliance_contains_third_party_cryptography: "false",
     export_compliance_is_exempt: "false",
     export_compliance_uses_encryption: "false",
     export_compliance_app_type: nil,
     export_compliance_encryption_updated: "false",
     export_compliance_compliance_required: "false",
     export_compliance_platform: "ios",

     content_rights_contains_third_party_content: "false",
     content_rights_has_rights: "false",

     #Advertising Identifier
     add_id_info_limits_tracking: "false",
     add_id_info_serves_ads: "false",
     add_id_info_tracks_action: "false",
     add_id_info_tracks_install: "false",
     add_id_info_uses_idfa: "false"
 });
结合 .env 文件, 不难理解 Appfile 和 Deliverfile 中的内容
-
编辑 Fastfile
在fastlane目录下, 打开Fastfile, 编辑内容:
1
2
3
4
5
6
7
8
9
10
11
12
13
14
15
16
17
18
19
20
21
22
23
24
25
26
27
28
29
30
31
32
33
34
35
36
37
38
39
40
41
42
43
44
45
46
 default_platform(:ios)

 platform :ios do

   desc "发布app到 App Store 或者 Fir.im "
   lane :your_lane_task_name do
     # add actions here: https://docs.fastlane.tools/actions
     sh "fastlane release(打包类型或者adhoc) --env target_name"
   end

   desc "发布指定Target到 Fir.im"
   lane adhoc do
   gym(
     clean:true, #打包前clean项目
     workspace: "YourProject.xcworkspace",
     export_method: "ad-hoc", #导出方式
     scheme: ENV['SCHEME_NAME'], #scheme
     output_name: ENV['SCHEME_NAME']+".ipa", # ipa 文件名
     output_directory: "./ipa", #ipa的存放目录
     export_options: {
         provisioningProfiles: {
             "项目bundleID"=>"描述文件名称",
         }
     }
   )
   # 前往fir.im获取 api token, 将鼠标放置右上角账号上面, 在下拉窗选择API token
   # 若使用的蒲公英, 请前往 https://www.pgyer.com/ 查看上传方法
   # 如果使用Firimfile, 此处为 firim 即可
   firim(firim_api_token:'你的firim_api_token')
   end

   desc "发布指定Target到 App Store"
   lane : release do
   gym(
     clean:true, #打包前clean项目
     workspace: "YourProject.xcworkspace",
     export_method: "app-store", #导出方式
     scheme: ENV['SCHEME_NAME'], #scheme
     output_name: ENV['SCHEME_NAME']+".ipa", # ipa 文件名
     output_directory: "./ipa", #ipa的存放目录
   )
   deliver
   end

 end
如图:
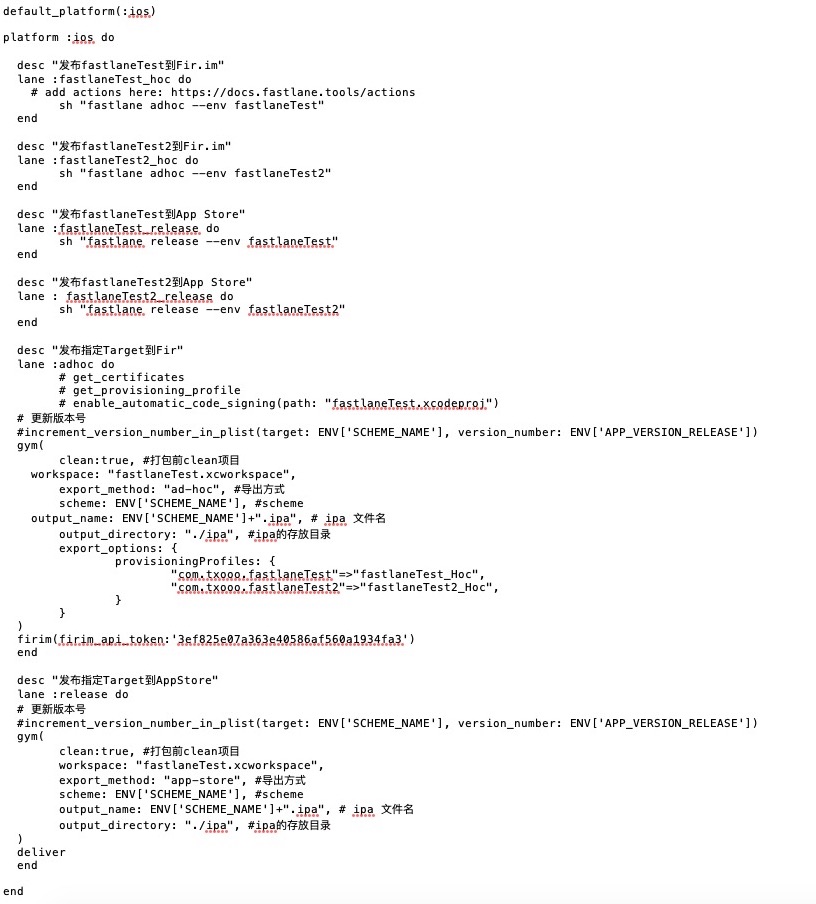
注意: 如果使用CocoaPod, 在gym命令下的workspace必须设置
使用firim插件, 也可以自定义firim配置文件, 具体操作为新建 Firimfile, 编辑内容:
1
2
3
4
 firim_api_token "你的fir.im API Token"
 # 使用firim(firim_api_token:'你的firim_api_token') 上传后 fir.im 看不到icon, 所以加上这个配置, 具体为你设置的icon本地路径,  其中 ENV['APPICON_PATH'] 在.env文件中 : APPICON_PATH = "./fastlane/metadata/app_icon.jpg"
 icon ENV['APPICON_PATH']
 platform "ios"
还有参数 ipa (导出的ipa路径), platform等, 会根据上下文自动获取, 可以省略
-
-
发布应用
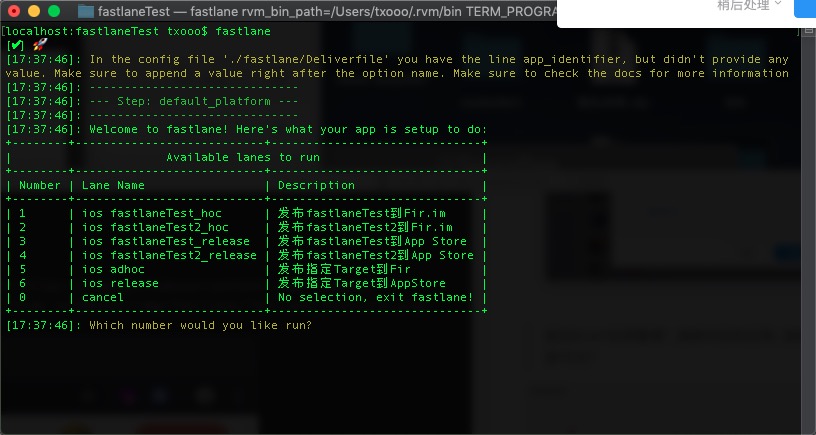
在终端输入fastlane, 输入对应的发布版本, 等待发布完成即可
使用钉钉机器人进行消息通知
设置钉钉WebHook
登录钉钉, 选择对应群聊, 点击右上方’···’选项, 打开群设置;
找到群机器人, 点开选择添加机器人, 在对应群机器人列表中可能找不到fir.im, 此时选择自定义, 按提示添加, 输入自定义机器人名字(最好能体现功能), 可选择上传自定义头像, 接受消息的讨论组(默认当前群组)
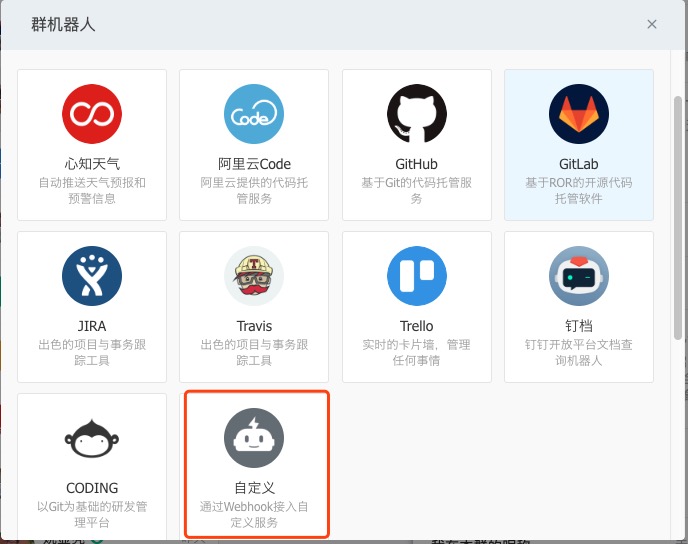
点击完成后会看到webhook页面, 点击复制
前往fir.im”应用管理”, 选择对应的应用, 选择应用图标右侧”集成”选项, 找到”钉钉”
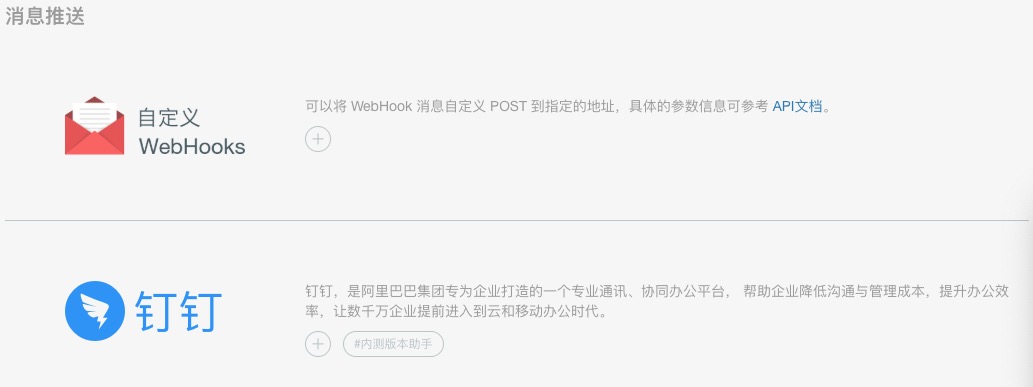
点击”+”号, 输入配置名称, 并将钉钉中的webhook地址粘贴于此处并添加
测试钉钉机器人:
-
使用命令行工具curl
1 2 3 4 5 6 7
curl 'https://oapi.dingtalk.com/robot/send?access_token=xxxxxxxx' \ -H 'Content-Type: application/json' \ -d '{"msgtype": "text", "text": { "content": "测试一下" } }' -
直接上传一个ipa到fir.im
注意查看钉钉群聊消息
